The cp command in Linux is used to copy files from one location to another or create duplicate copies of the same files as required. In this tutorial, we’ll go over the cp command in detail and understand the usage and the basic options that are used along with the command.
Basic syntax of cp command:
cp [options] <source> <destination>
The cp Command Options
The command will simply copy a file from one location to the other and overwrite any existing files by default. But let’s go over the command options that allow us a fair bit of flexibility.
1. Create Backup Before Copying
The -b option creates a backup of the destination file in the same folder so that if you accidentally overwrite a file, the backup will allow you to restore the original documents.
cp -b <source> <destination>

If I do a copy without the -b option in the above case, the main2.js file would’ve been overwritten by main.js and I would lose the contents of the second file. The file with the tilde (~) symbol as a suffix is the backup file that contains the original contents of the destination file.
2. Prompt Before Overwrite Using cp Command in Linux
As we’ve already seen that the cp command in Linux does not check before overwriting an existing file. This is fine when we’re working with single files as manually checking the destination file is doable. But if you’re working with files in bulk, you can avoid accidental overwrites by using the -i option which stands for interactive.
cp -i <source> <destination>

Compared to the screenshot above, you can see that the addition of -i allows us to prompt before overwrite.
3. Preserve File Meta While Using cp Command in Linux
The cp command by default just replaces all the metadata of the file with the current data. But if you want to copy the file along with the metadata, you need to ensure the use of the -p option.
cp -p <source> <destination>
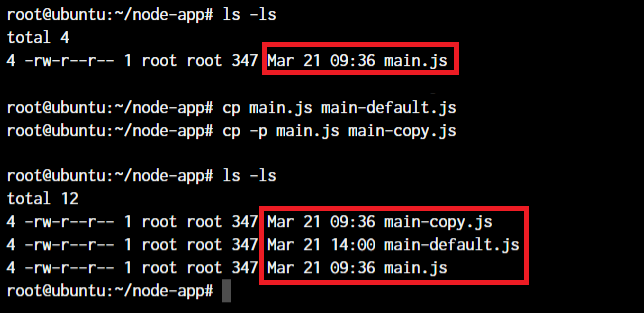
Notice the time metadata about the file. The main-copy.js file retains the creation time of the file whereas the main-default.js replaces it with the current server time.
4. Recursive Copying Using the Linux cp Command
When copying directories, the cp command will display an error if the -r option is not specified. Why does it do that? Because the cp command doesn’t know what to do with the files and folders inside a parent directory when you simply specify the parent directory name.
With the recursive option, you can specifically ask the cp command to copy the entire directory structure along with the parent.
cp -r <source directory> <destination directory>
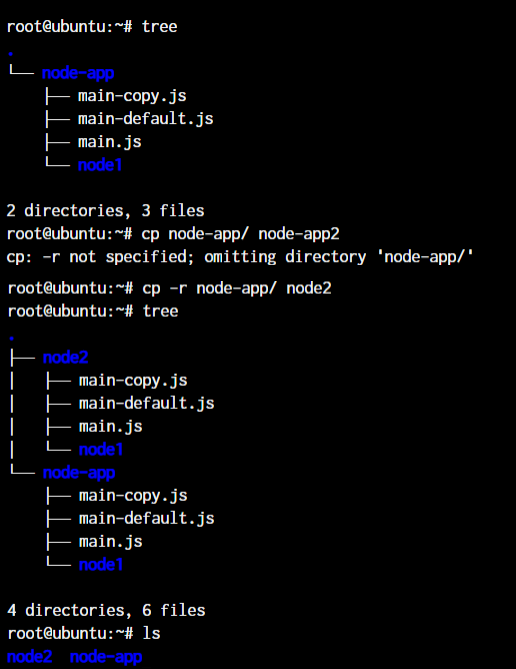
5. Working With Links Using the cp Command in Linux
There are multiple ways you can deal with symbolic links when using the Linux cp command. Let’s go over a few ways.
If you want to copy the link, instead of the original file, you can use the -P option.
cp -P <symbolic link> <destination symbolic link>
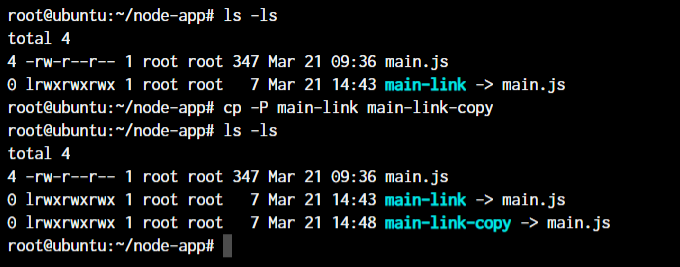
Make a copy of the file that is being linked by the symbolic link using the -L option which “follows links”
cp -L <symbolic link> <destination file name>
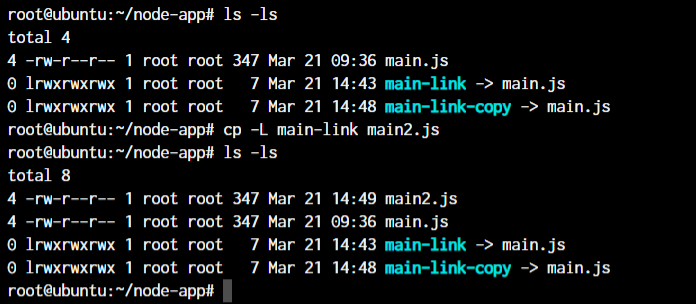
As you can see from both the screenshots, the -P option will create another symbolic link that links to the file that the source file points to. The -L option will find the source file and then make a copy of it.
6. Create Symbolic Links With cp Command in Linux
Now we know how to work with existing links. But if you want to create a symbolic link, you can use the cp command too. We’ve covered an entire topic on creating symbolic links in Linux earlier. Let’s discuss how to create symbolic links using the cp command in Linux.
cp -s <source file> <link name>
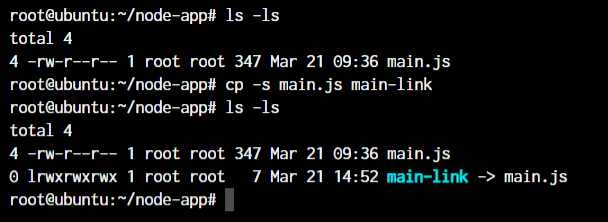
As you can see in the above screenshot, I have created a symbolic link for the main.js file.
Conclusion
In today’s tutorial on the cp command in Linux, we’ve covered all the majorly used command options for the cp command. There are quite a lot of options and a lot of flexibility offered by the cp command which you can explore through the use of man pages.


