
Why does the DNS reply list the resolver as Source when the query listed it as Destination? I couldn’t resist digging into how those fields mark the answer’s return trip.
Wireshark turns that question into something you can inspect on Ubuntu or Debian. Get it running and start a capture while a DNS lookup takes place.
What Wireshark captures on Ubuntu and Debian
Wireshark is a graphical network protocol analyzer that reads packet captures and can collect packets from an accessible interface. The GUI decodes packet fields while dumpcap handles live capture, which means installing the analyzer does not grant every account capture access.
The Wireshark User’s Guide documents distribution packages for Debian and Ubuntu. Package capture permissions still decide which accounts can collect live traffic.
| Part | What it does | What you need |
|---|---|---|
| Wireshark | Displays and analyzes packets | A graphical desktop to use the GUI |
| dumpcap | Captures packets from selected interfaces | Capture access granted by the package configuration |
| APT package | Installs the version built for your Ubuntu or Debian release | Repositories configured for that release |
Capture only traffic that your account is authorized to inspect. Encryption can keep packet contents private while Wireshark still displays connection metadata.
Check your system before installing
APT installs the Wireshark package published for your distribution release, so the upstream stable release and your repository’s candidate version can differ. Ubuntu’s release list names supported Ubuntu images, and the Wireshark download page lists upstream releases separately.
- Use an Ubuntu or Debian system with working APT repositories.
- Have an account allowed to install system packages with sudo.
- Use a desktop session if you want the graphical Wireshark application.
- Plan to capture only from interfaces and networks you are authorized to inspect.
If you are unsure which Ubuntu release is installed, check your Ubuntu release before comparing package versions. Debian uses the same APT package name, but its repository candidate follows the Debian release you run.
Install Wireshark from APT
I kept the distribution package as the default route because this task is installing Wireshark for the release you run, not chasing a separate build. A PPA or source build adds another installation path and is only useful when you need a specific version or feature your repository does not provide.
1. Refresh the package index
Update APT’s package lists so it can resolve the packages available from your configured repositories. This reads repository metadata and does not upgrade the packages already installed.
sudo apt update
2. Check the Wireshark package candidate
APT can show which Wireshark package version its current indexes select before you install it. I ran apt-cache policy wireshark on Ubuntu 24.04 and saw candidate 4.2.2-1.1build3 from the Noble arm64 Universe repository. Your candidate comes from the repositories enabled on your system, which means different releases can offer different versions.
apt-cache policy wireshark
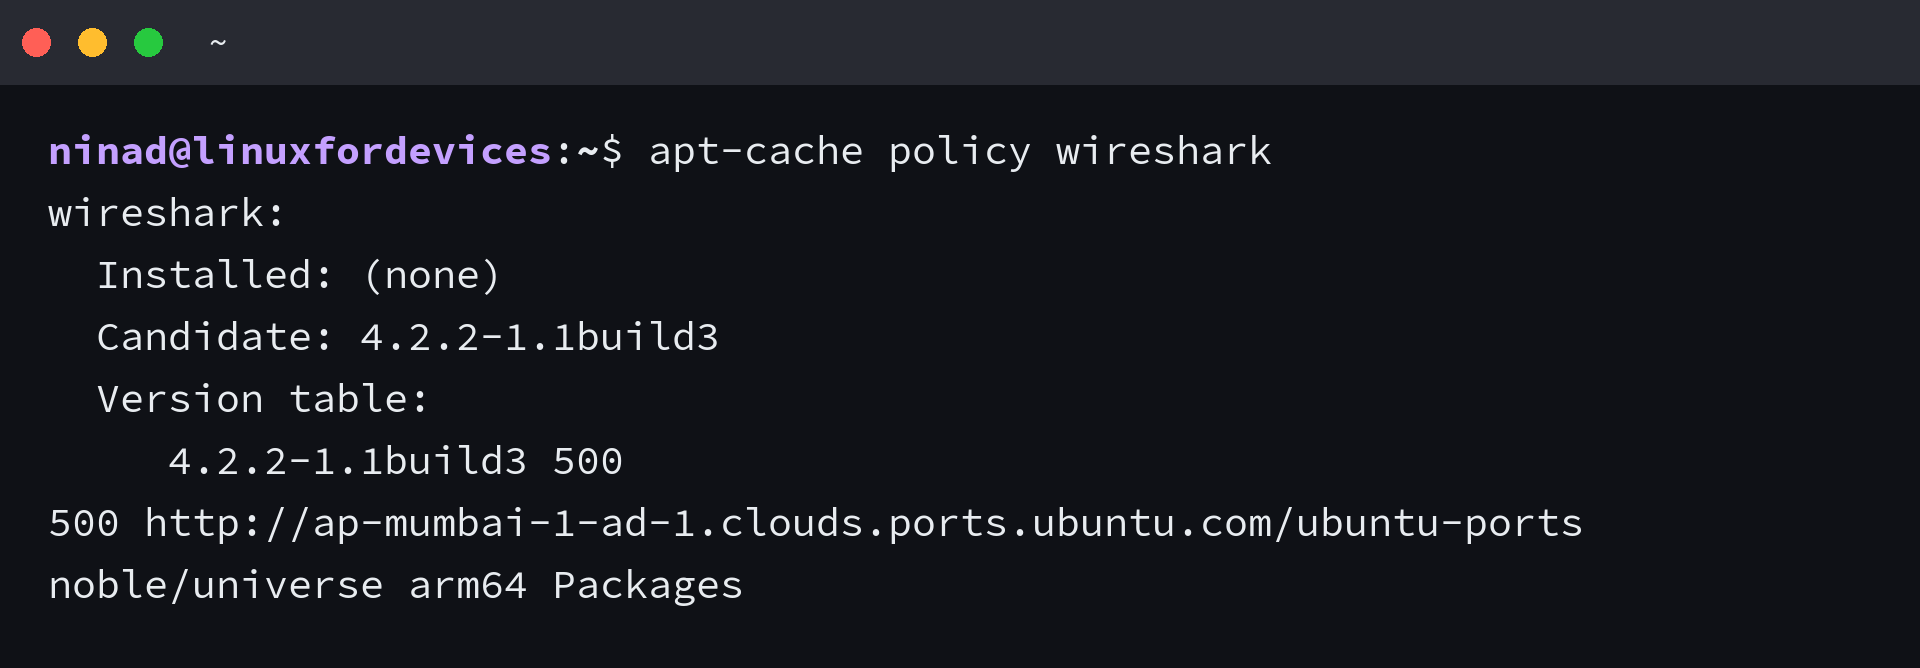
APT selects from its currently enabled package indexes. The upstream release page is a separate channel, so package versions differ by distribution.
3. Install the package
APT installs Wireshark with its package dependencies and may display a configuration prompt about packet capture during setup.
sudo apt install wireshark
When the installer asks whether non-superusers may capture packets, choose Yes if your account needs live capture. The setting grants that access to wireshark-group members but does not add your account automatically.
After installation, you can also list installed APT packages to confirm the package is present. The candidate check above only reports what the repositories offer, not whether Wireshark is already installed.
If you decide not to keep the application, follow the instructions to remove a package with APT rather than deleting its files by hand.
Give your account packet-capture access
Wireshark can analyze saved capture files without live-interface access.
| Installer choice | Effect | When it fits |
|---|---|---|
| Yes | Members of the wireshark group can capture packets | When your account needs to start live captures |
| No | Regular accounts do not receive capture access through this package setting | When capture should stay limited to an administrator-managed process |
The package prompt asks whether non-superusers may capture packets, so choose Yes when this account needs live capture. The screenshot shows the choice, and current packaging documentation confirms that Yes grants access to wireshark-group members.
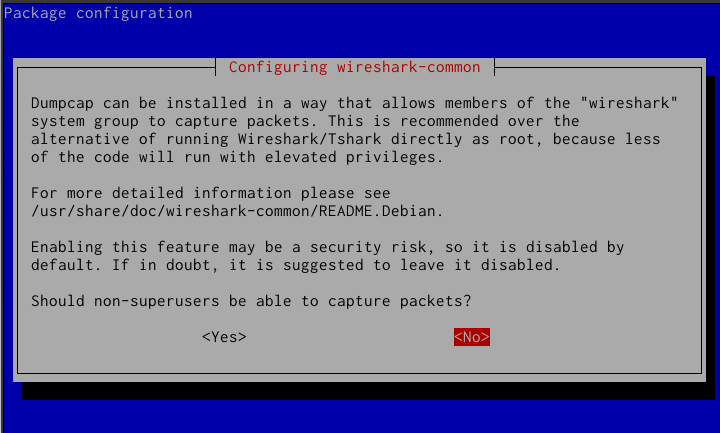
Choosing No still lets you analyze saved capture files.
The Wireshark Debian packaging README documents dpkg-reconfigure wireshark-common as a way to change the choice later. It asks the capture-permission question again, so choose Yes if you want your account to capture.
sudo dpkg-reconfigure wireshark-common
The package does not add users to the wireshark group automatically, so add your account with the next command.
sudo usermod -aG wireshark "$USER"
Sign out and back in so the new group membership reaches applications you start.
Keep Wireshark running as your regular account. The package grants capture access to dumpcap rather than the entire GUI.
Start a capture in Wireshark
Open Wireshark from the desktop menu and look for activity beside each capture interface.
The official example below is from Wireshark on Windows. Use it to locate the interface list and Start control, not to match Ubuntu’s interface names.
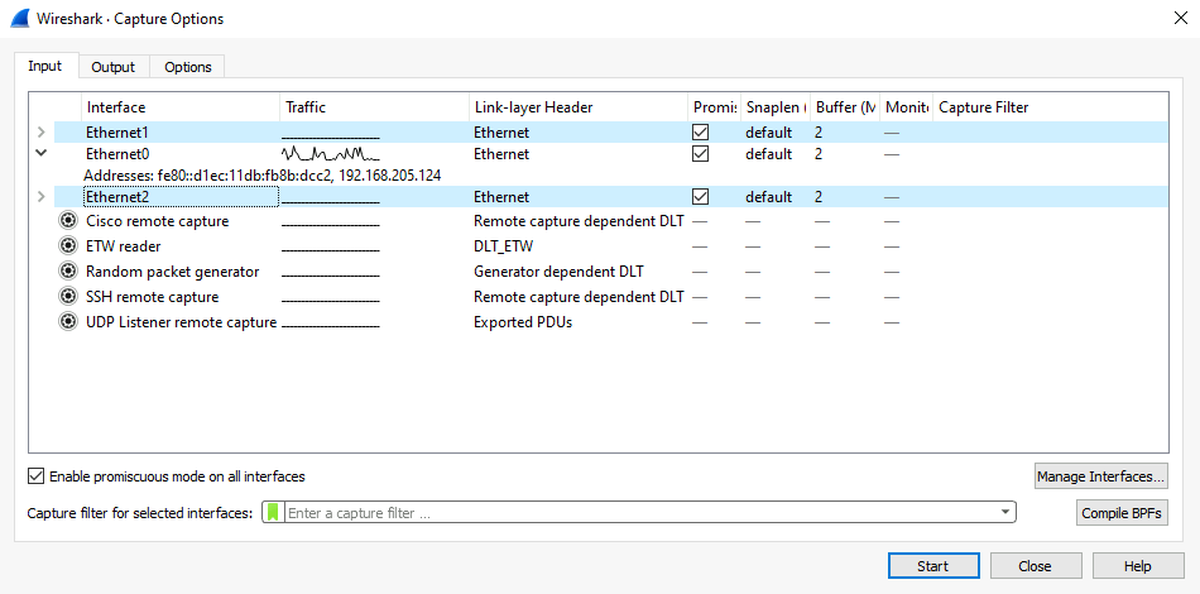
- Choose an interface that carries the traffic you are allowed to inspect. If the name is unfamiliar, the Ubuntu network configuration guide can help you identify your configured adapters.
- Double-click the interface to start capturing, or select it and choose Capture, then Start. Wireshark documents both actions in its capture-start instructions.
- Let the packet list fill, then select a packet to inspect its decoded fields. The source and destination addresses can help you identify the endpoints, and you can find your IP address in Linux if you need to match an address to your machine.
A display filter narrows the rows shown after packets have been captured. It does not remove packets from the capture file, so clear it before changing capture permissions if the list looks empty.
Enter a protocol name such as dns in the display-filter bar and press Enter to show matching packets.
dns
A capture filter works earlier and decides which traffic to collect. Start with no capture filter while learning the interface, then add one only when you know which packets you need to save.
Fix missing interfaces and permission errors
An application window can open while live capture still fails because interface access belongs to dumpcap rather than the packet-list view. Match the message to the missing permission or interface before changing package settings.
| What you see | Likely cause | Next check |
|---|---|---|
| No interface can be used for capture | Your account lacks capture access, or the system does not expose an accessible interface | Revisit the wireshark-common choice, check group membership after signing back in, then list interfaces |
| dumpcap reports permission denied | The account is not in the wireshark group, or the current session still has its earlier group list | Add the account with usermod and start a fresh desktop session |
| Capture starts but no packets appear | The selected interface may not carry the traffic you expect, or a display filter may hide every row | Choose an active interface and clear the display filter before changing permissions |
Wireshark’s capture-privileges guide notes that interfaces can be absent when the current account cannot access them. In a virtual machine or container, the host can also limit which interfaces the guest or container receives.
A virtual machine or container must expose the interface to its guest, because group membership cannot create a missing device.
Keep packet-capture privileges narrow
With this package setup, dumpcap handles capture access while the Wireshark GUI stays under your account. That separation keeps packet collection narrow, so you can analyze saved files without granting live-capture access.
Run dumpcap -D to list the interfaces your account can access. Then use a permitted task such as traceroute and inspect its packets on that interface, stopping the capture when the exchange is complete.
dumpcap -D
Wireshark installation questions
An installed package confirms the application is present, while the interface list reflects what the current account can capture. If those checks differ, inspect the package setting and group membership before reinstalling.
Can I install Wireshark on Debian with APT?
Yes. The Wireshark User’s Guide lists packages for Debian and Ubuntu. Install the wireshark package from the repositories configured for your Debian release, then configure dumpcap access if you need live capture.
Do I need to run Wireshark with sudo to capture packets?
No. Configure the package’s dumpcap permissions, add your account to the wireshark group, and sign out and back in. Keep the graphical Wireshark application running as your regular account.
Why does Wireshark open without showing capture interfaces?
Installing the GUI does not grant live-capture permission to every account. Enable non-superuser capture in wireshark-common, add your account to the wireshark group, start a new session, and check the interfaces listed by dumpcap.