In this tutorial, we will learn how to install Java on Debian. But before we begin to install Java on Debian, let’s first learn about Java. Have you ever thought that how PC’s would picturise the images, videos, and audios, how did the computer add two numbers in earlier days? I am asking this because the computer only understands machine language i.e. in terms of 0’s and 1’s. After some time, assembly language came into existence, changing the assembly language into machine language.
It was followed by high-level languages like C, C++. However, compiling is resource-intensive and there might be a chance of compatibility issues. Therefore, Java came into existence. Java already has a compiler called Java Compiler which converts a .java file into byte code(.class file). This bytecode is converted into the native machine code by JVM (Java Virtual Machine). If we talk about the environment or architecture of Java, it can be divided into two parts:
- Compile-time environment
- Run-time environment
The compile-time environment consists of the source file, compiler, and class file. The source file is converted into the class file through the compiler. Here it comes with an advantage, this class file generated can be executed by any machine that supports the Java Runtime Environment.
The Run-time Environment is basically the Java Virtual Machine where your Java programs run. JVM is responsible for executing Java Programs on the computer. It is responsible for executing the bytecode and generating the machine-specific code for the machine on which the Java program needs to be executed. The major components of JVM are class loader, Execution engine, and Bytecode verifier.
JRE is a part of the JDK( Java Development Kit). JDK contains both JRE as well as the development environment. If you install JDK, JRE will automatically be installed on your system. Java is the widely used programming language to create GUI based applications that can run on a single computer or on a network of computers.
What makes Java best? It is a platform-independent language. The compiled code can run on any platform; on phone or on any computer.
Talking about its edition, Java has four editions:
- Java Platform Standard Edition (Java SE)
- Java Platform Enterprise Edition (Java EE)
- Java Platform Micro Edition (Java ME)
- Java FX.
Don’t get confused between SE and EE, both are different things. Java EE is used to develop enterprise apps while Java SE is used to create portable desktop apps.
Java implementations are done in two ways either using OpenJDK or Oracle Java. There is a little bit of difference between both of them i.e. Oracle Java offers some additional commercial features too.
I hope its cleared about Java. Let’s understand how to install Java on Debian.
When you want to install Java on Debian, there are three methods that can be followed
- Install Java on Debian using the default-JDK on the system
- Installing JDK of a particular version
- Installing Oracle-JDK on the system.
Let’s have a look at the methods one by one:
Install Java on Debian – Default JDK Package
Here, we would install Java on Debian using the default JDF method. This is done whenever you aren’t aware of which version to install. This is very useful for the beginners as they find it quite easy to install the default JDK. Let’s look at the steps to install and uninstall the default-JDK version.
Update the repositories
The first step is to update the repositories. For this, we will use the apt command. This command is helpful for installing new packages, updating the existing software packages, updating the package list index, and even updating the entire Debian system. Let’s check the syntax of this updating the repositories:
# sudo apt update
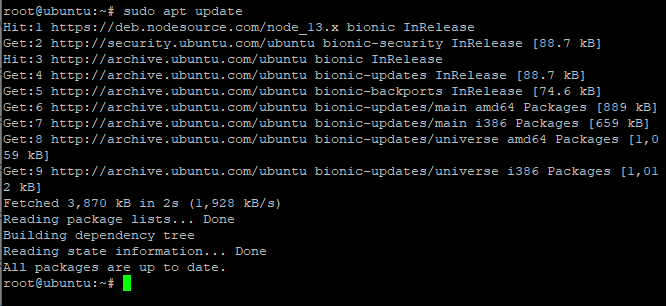
All the packages are successfully updated.
Use Apt to Install the default-jdk package
Why I have installed the default-JDK? Whenever you are confused about which version to install in Java. Use this command, it will install the default version of Java. Similarly, here we will use the apt command to install the Java version. I have already discussed the significance of the apt command above. Let’s have a look at the command below:
# sudo apt install default-jdk
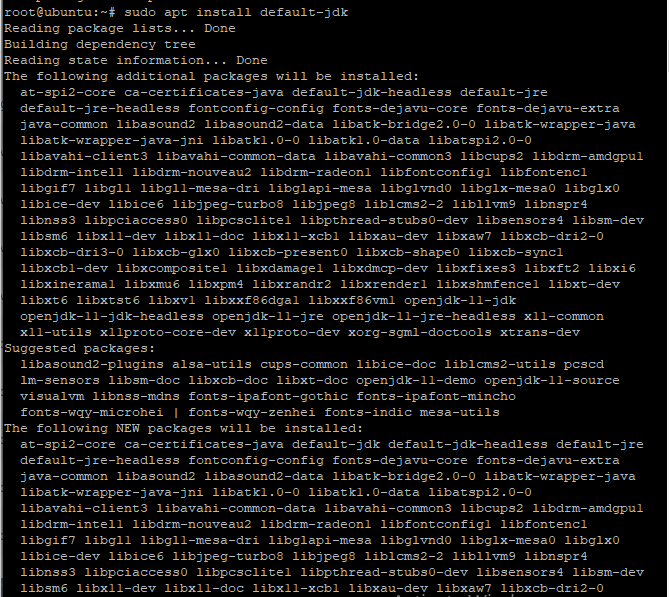
Check for the Version
After successfully installing the default JDK, if you want to check the version you can use version command to know which Java version is installed in your system. A simple command is used to check the version. The command for this is as follows:
# java --version

Here, you will see the version of Java. The OpenJDK 11.0.6 is installed in my system.
Remove the Default JDK version
As of now, we have learned how to install the default JDK in Debian. Let’s discuss how to remove this default JDK version from our systems. Here autoremove with the apt command is used to remove the default version. Look how apt command is so useful to us! The command to remove is given below:
# sudo apt autoremove default-jdk

Install Java on Debian by Specifying a Version
As of now, we have discussed how to install the default JDK version of java. Here we will learn how to install the Java package of a particular version. It also has easy steps to follow. Let’s discuss the steps.
Add the backports
To download the OpenJDK of a specific version, the first step is to mention the link to add the backports to the repository list. Here, through echo command, I have mentioned the link. Let’s have a look at the command below:
echo 'deb http://ftp.debian.org/debian stretch-backports main' | sudo tee /etc/apt/sources.list.d/stretch-backports.list

Install Java of a Specific Version on Debian
Simply you have to notify the specific version which you want to install either 9, 10 or 11. Use openjdk-[version number]-jdk to install Java. We will use the apt command to install the Java version. I hope you are cleared with the use of the apt command as discussed above. Let’s have a look at the command:
# sudo apt install openjdk-11-jdk

This command will successfully install the OpenJDK of a particular version.
Check the version
After successfully installing the OpenJDK of a specific version, we can also check the version using the same command as we used above. The command for this is as follows:
# java --version

It will print the version details of the Java installed.
Remove the Install Java
If we know how to install the software, then we should also learn how to uninstall the same software. Above also, I have discussed how to remove the default JDK. Here, you have to do nothing. The command will remain the same, only the name of the installed Java version will get changed. Let’s see how this happens:
# sudo apt autoremove openjdk-11-jdk
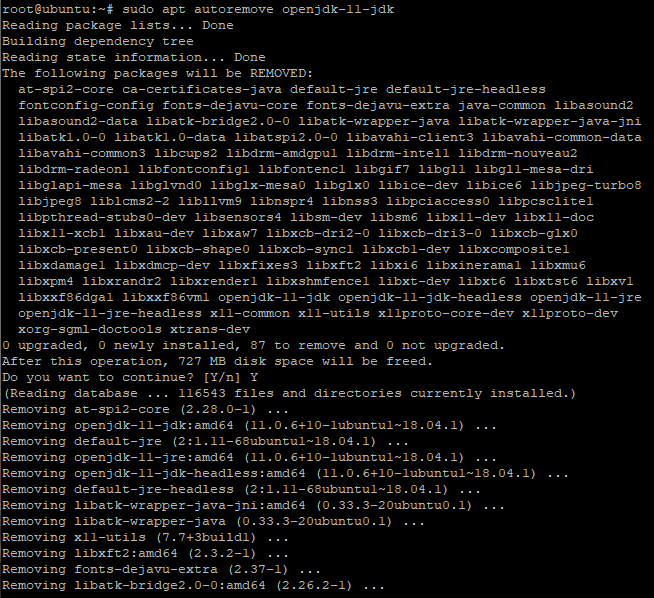
Just change the version name in the command used above.
How to install Java on Debian from Oracle
As far as we have discussed the steps to install DefaultJDK and OpenJDK of a specific version. Let’s learn about how to install Java on Debian directly from Oracle repositories.
Install or download the file for Debian OS
Here, you would see that I have already downloaded the .deb file from the Oracle’s official website. Click here to download
You can download any of Java version you want from this link. You need to just accept terms and conditions with a license agreement. I have already downloaded it. If the version is of “.tar.gz”, use tar -xvf to extract the file or if it is “.deb“, use “./” followed by the file name as shown below. Here, I have downloaded it already on my system. The command for this is as follows:
# sudo apt install ./jdk-14_inux-x64_bin.deb
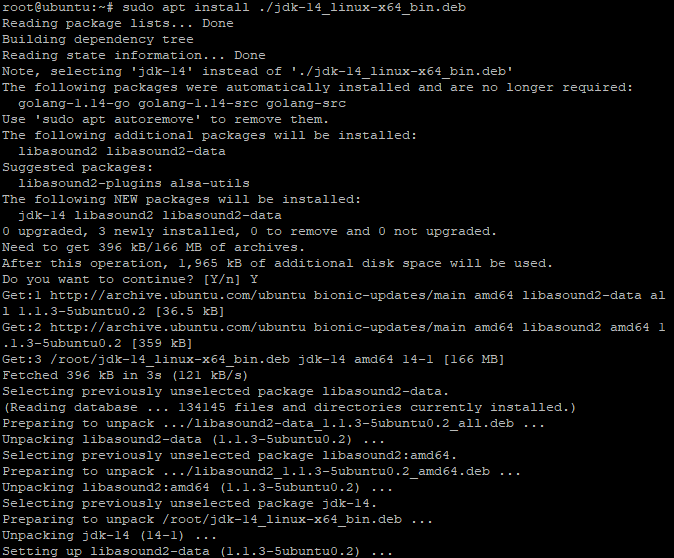
This would simply install the Oracle Java version.
Check for the version installed
As we have successfully downloaded the Oracle JDK, we can also verify the version installed by just giving the pathname. We know that it is installed in the /usr/lib/jvm directory. So, by giving this path it would display the version name of the Java. Let’s have a look at the command below:
# /usr/lib/jvm
jdk-14
Here, you would the version installed on your system.
List all the JDK Packages
What if, you want to check the files present in the JDK folder or you want to find the path of any file. Just mention the path to the folder and it would list all the files present in that particular directory. All the JDK files are stored in /usr/lib/jvm/jdk-14 directory. Let’s have a look at the command below:
# ls /usr/lib/jvm/jdk-14

You can see the output as the list of all the files present in the JDK directory.
Create alternatives in Java
We have learned how to get the path to any file or directory. You might be thinking that what is the use of creating alternatives. Basically, it helps to create symbolic links for default commands. Remember one thing, the command described below might show an error when you run it for the first time. Don’t worry about that, hit the command two or three times. It would run successfully. Let’s have a look at the command below:
# sudo update-alternatives --install "/usr/bin/java" "java" "/usr/lib/jvm/jdk-14/bin/java" 1

This command would successfully create alternatives.
Check for the Oracle Verison installed
Earlier we discussed the command to print the version name only. Here, this command used below will print the complete details of the Java version installed in the system. You can yourself check the difference between both the commands. The command for this is as follows:
# java --version

It would print the complete details of the JDK version installed.
Set the default version
Sometimes it happens that you might install various JDK versions on your system. In this situation, you need to select one JDK version to work upon. Use update-alternatives command to print all the Java versions installed. Now, after getting the list, select the version you want to use. Let’s have a look at the command below:
# sudo update-alternatives --config java

Select the appropriate version from the list and continue with the work!
Set the environment variables
As of now, we have successfully installed the JDK on our system. So let’s understand how to set the environment variables. Let’s have a look at the steps discussed below:
Select the path for JAVA_HOME
Here you need to select the path for the JAVA_HOME. As it might be possible that you would many different Java versions installed on your system as I have discussed above. Select the path by running the following command as shown below:
# sudo update-alternatives --config java

Here, just copy the path you want.
Set the path in the file
Here, you need to paste the path in the file. Just edit the /etc/environment file, add the path in this file. The command to edit the file is as follows:
sudo vim /etc/envionment
Paste your JAVA_HOME path value:
JAVA_HOME = "/usr/lib/jvm/jdk-14"
To exit the text editor mode, either press Ctrl+C or press Esc followed by :wq! command to save the changes. Once saved, run the below command to refresh the existing environment variables.
# source /etc/environment
Therefore, you have successfully set the path. If you want to verify the path, you can use the cat command to print the data. You will get to know that the changes you made have been successfully saved or not! You can use any of the described commands below:
# cat /etc/enviornment
Or
# echo $JAVA_HOME

Print path using the echo command:

Conclusion
That’s it! You now know how to install Java on Debian. If face any issues, then do let us know in the comment section.
