In this article, we’ll learn how to change screen resolution in Linux. If you are using a desktop or even a laptop with an external monitor, there are chances that you have faced this seemingly annoying problem of the display not fitting the monitor or a zoomed-up display. These problems are usually caused when the screen resolution is not correct. So here we will see a way by which you can fix the screen resolution of your Linux device.
Also read: 7 Best Screen Recorders for Linux – Easily Record Your Linux Desktop
Steps to Change Screen Resolution in Linux
XRandR is a powerful command-line interface to interact with displays. Anything related to setting the size, orientation or reflection of traditional Linux displays is handled by xrandr. We will be using this utility to change screen resolution.
Step 1 : List all the available displays
Let’s get the xrandr utility to display the names of the active monitor.
xrandr --listactivemonitors

As you can see I have only one display available i.e. eDP-1 .
Step 2: List all available resolutions for each display.
Next, let’s list out all the resolutions possible on your monitors. This will help us set up the proper aspect ratio.
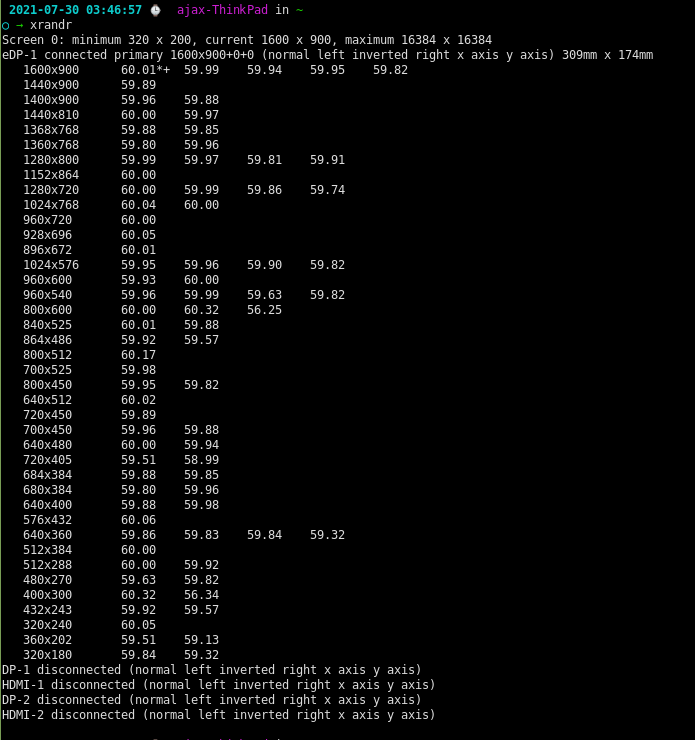
xrandr

The output tells us the current resolution (1600×900) and all the available resolutions for eDP-1. If you have multiple screens hooked up, it will list the available resolutions for all those screens.
Step 3: Set the preffered resolution
Say your preferred resolution for eDP-1 is 1400×810. To change the resolution, use the –mode flag with xrandr as shown.
xrandr --output eDP-1 --mode 1400x810
Additional Step : What if your preferred resolution is not available?
If your preferred resolution is not in the list of available displays, you can add a new custom display resolution. For example, suppose we have to add a resolution of 1300×649.
To do that we have to find out some metadata regarding our custom resolution and then add that metadata to xrandr available resolution list. The cvt (Coordinated Video Timings) the utility can help with generating the required metadata as follows :
cvt 1300 649

Now copy the Modeline from the output and paste it with the –newmode command as shown.
xrandr --newmode "1304x649_60.00" 67.50 1304 1360 1488 1672 649 652 662 675 -hsync +vsync
The next step is to add this mode to a specific display. Here my display name is eDP-1, so I am going to run
xrandr --addmode eDP-1 "1304x649_60.00"
Now simply follow Step 3 to set this as your default resolution.
Conclusion
Setting a custom resolution on any Linux device can be done through Xrandr. To learn more about Xrandr you can see its man page. Have fun exploring!
