A WiFi network is an internet connection network that’s shared with multiple devices in a home or business via a wireless router. All of your WiFi-enabled devices can access the internet through the router, which is directly connected to your modem. If the proper credentials are entered, any computing device can use the wireless connection.
Also read: Network Configuration Guide for Ubuntu
Setting up WiFi in Linux Mint is pretty easy, but of course, you need to set up your WiFi adapter first. This article will demonstrate how to connect to WiFi on Linux Mint.
You can connect to the WiFi network in Linux Mint in two ways.
- Using a Graphical User Interface(GUI).
- From Command Line Interface(CLI).
Quick note – What is a Network Manager?
The Network Manager is a system network service that manages your network devices and connections, attempting to keep connectivity when available. It provides VPN integration with a variety of different VPN services and manages ethernet, WiFi, mobile broadband (WWAN), and PPPoE devices
Using a Graphical User Interface
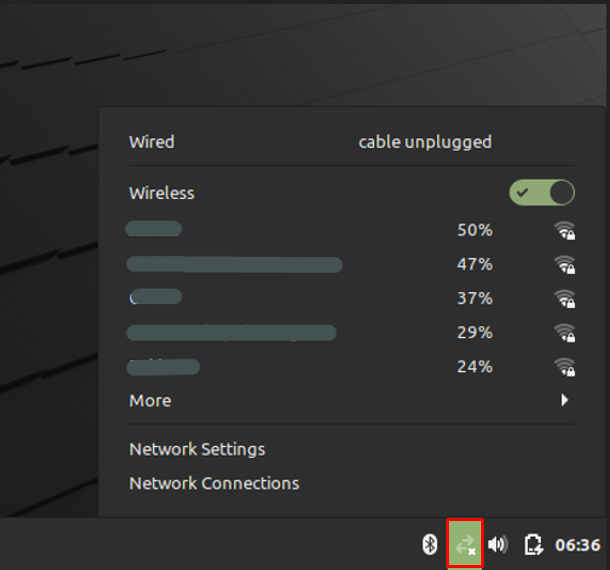
Assuming that your WiFi adapter is working properly, the right side of the panel will display two arrows with a small x to indicate that your Linux monitor is not yet connected to the wireless network.

Step 1: Click on the connection symbol, it will show up the list of all the accessible WiFi networks, as shown in the image below.

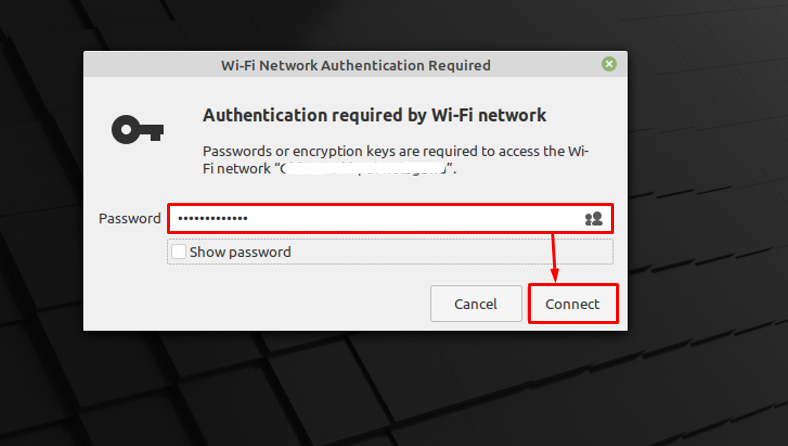
Step 2: Next, choose the network you want to use to connect your device, then enter the password to complete the connection. A “Connection Established” prompt will show up once your device is connected to the network successfully.

Now that we’ve covered one of the two methods for connecting to the network using the GUI in Linux Mint, let’s talk about the other one.
From The Command Line Interface
Every Linux system includes a command line of one sort or another. To allow Linux Mint to connect to WiFi, you must run several commands.
Step 1: In this method, the first thing you should do is trace your wireless network by going to the directory that contains network information. To make it so, enter the directory’s location, “/sys/class/net.” It will trace the available networks. You can use the ls command to obtain a list of accessible networks.
$ sudo ls /sys/class/netStep 2: This step involves configuring the network file by running the netplan utility command. The network interfaces, where you can place your wireless network configuration, are configured by Netplan using the YAML description files.
$ ls /etc/netplanStep 3: The “1-network-manager-all.yaml” file will subsequently be returned. Open this file in nano or another text editor at this point. The first three lines will be present once you open it in a text editor; It will ask you to enter the network name and password for the network you want to connect to. Now, simply enter your information, append the following lines, and then save the document.
Wifis:
    Wlp2s0:
        optional: true
          access points:
              "SSID (name of your wireless network)"
                     Password: "Password of your wireless network"
          dhcp4: true
Step 4: Execute the following line of code to apply the netplan configuration change after executing the command given below;
$ sudo netplan --debug applyOnce you enter the above command, the connection will be established and you can confirm it by using the IP command.
Summary
WiFi is the most widely used computer network used globally at home, offices, coffee shops, etc. to connect laptops, tablets, PCs, and smartphones to the internet. Connecting Linux Mint to a WiFi network is quite an easy process. In this article, we have covered the two methods of connecting to WiFi.
The first method, using the GUI, is quite simple and takes less time than the second, which uses the CLI. As a Linux user, you should also be familiar with the CLI method, despite the fact that it may seem tedious and time-consuming.
.
