
Secure boot on a Windows PC blocks any bootloader without a trusted signature, and that stops plenty of Linux installers cold. To disable secure boot and install Linux, you first open the UEFI firmware settings from Windows, then flip the toggle inside it. This guide covers both ways into firmware, the actual toggle for popular manufacturers, why some distros skip this step entirely and what happens to secure boot once Linux is running.
What secure boot actually blocks
Secure boot is a UEFI firmware feature that checks every bootloader against a signature database before it runs. If the signature is missing or untrusted, firmware refuses to hand off control. The boot process stops right there instead of loading an operating system.
That check can catch out more than just a Linux installer:
- Unsigned or self-built Linux kernels and custom bootloaders
- Third-party drivers without a recognized signature, Nvidia’s proprietary package most often
- Custom-built live USB images that were never signed
- Older boot paths like PXE network boot and some hibernate or resume setups
Whether any of that applies to you depends on which distro you are installing and what you plan to add afterward, which is worth checking before touching firmware at all.
Under the hood, firmware stores three things that make this work: a platform key that acts as the root of trust, a key exchange key that authorizes changes to the trusted list and a signature database of approved publishers. Every bootloader gets checked against that database before anything else loads.
Check whether secure boot is already on
There is no need to guess. Windows can report the current state without touching firmware at all.
- Press Windows + R, type msinfo32 and press Enter to open System Information.
- Look at the BIOS Mode and Secure Boot State rows on the System Summary page.
- BIOS Mode should read UEFI. Secure Boot State shows either On or Off. Off means someone already disabled it, or the PC shipped without support in the first place.
If BIOS Mode reads Legacy instead of UEFI, secure boot is not available until you switch the firmware into UEFI mode, since the feature only exists on UEFI systems.
Check whether you need to disable it first
Ubuntu, Fedora, Linux Mint and openSUSE all ship a bootloader (shim, a small trusted go-between that vouches for the real one) signed by Microsoft. Their installers usually boot and install with secure boot switched on. Try booting your installer USB first, since skipping a step you do not need saves a restart.
Arch Linux ships no signed shim by default. If you are following the Arch Linux install guide, plan on disabling secure boot early. The same goes for a self-built kernel or an unsigned driver such as an Nvidia DKMS module that has not gone through key enrollment.
What to check before you touch the firmware
A few checks before rebooting save a second trip back into firmware. None take longer than a couple of minutes.
- Back up your files, since a bad restart mid-write can occasionally interrupt a Windows session
- If your drive uses BitLocker, save the 48-digit recovery key first, since firmware changes can trigger a recovery prompt
- Confirm Windows is running in UEFI mode rather than legacy BIOS, since the Windows menu route below only appears on UEFI systems
- Plug in the Linux installer USB now so it is ready once you reach the firmware menu
- Decide whether Linux is going on the same drive as Windows or a separate drive, since that changes how you partition later
Skipping the BitLocker step is the single most common reason people get locked out of Windows after changing a firmware setting.
Enter UEFI firmware settings from Windows
Windows gives two independent doors into firmware settings. The advanced startup route works on any UEFI PC. The manufacturer key depends on your hardware and can be quicker once you know it.
Restart into advanced startup from Windows search
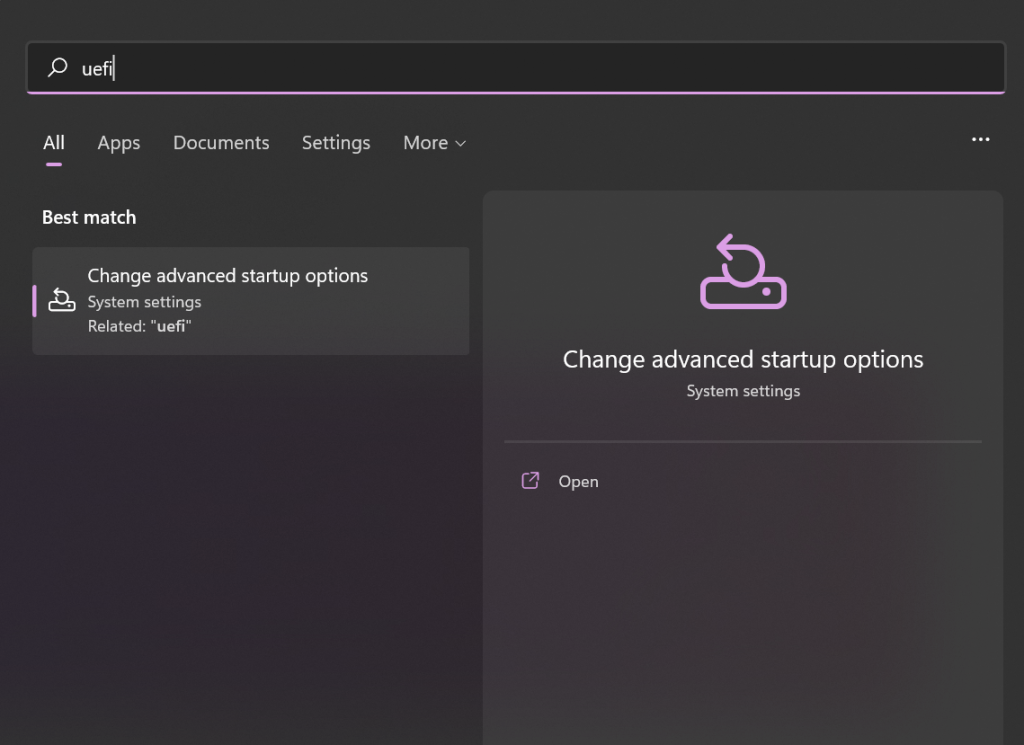
- Search for UEFI in the Windows search bar, then select Change advanced startup options.
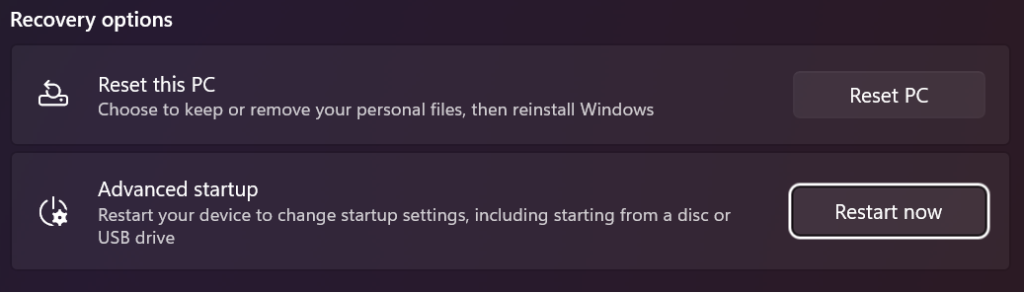
- Under Advanced startup, click Restart now. Confirm the restart, then Windows reboots into a blue Choose an option screen instead of the desktop.
- Select Troubleshoot, then Advanced options.
- Choose UEFI Firmware Settings if it appears, or Advanced if that is the only option shown. Click Restart, then the firmware setup screen loads directly.
Use your manufacturer’s firmware key at boot
Tapping the right key during startup skips Windows entirely and works even if Windows will not boot at all. Restart the PC and tap the key repeatedly the moment the manufacturer logo appears, before the Windows logo shows.
- Dell: F2 (F12 opens the one-time boot menu instead)
- HP: F10 (some models use Esc, then F10)
- Lenovo: F1 or F2, or Enter then F1 on ThinkPads
- Asus: F2 or Del
- Acer: F2 or Del
- MSI: Del
If your model is not listed, watch the first screen for a brief “Press X for Setup” prompt.
If neither key works, blame Fast Startup
Windows Fast Startup hibernates the kernel instead of shutting down fully, which can shrink your window for catching a firmware key to almost nothing. Turn it off from Power Options, under Choose what the power buttons do, by unchecking Turn on fast startup, then restart and try the key again.
How to disable secure boot in the firmware menu
Once the firmware setup screen loads, exact menu names shift by manufacturer, but the location stays consistent enough to follow on nearly any Windows 10 or 11 PC.
- Open the Boot, Security or Authentication tab, depending on your firmware. Secure Boot usually sits inside whichever of these three appears.
- Select Secure Boot and press Enter. Change the value to Disabled using the plus or minus key, or a mouse click on a graphical UEFI screen.
- Press F10, or the save key shown on screen, then confirm the prompt to save and exit.
On older machines you may also need to switch Boot Mode from UEFI to CSM or Legacy first. Otherwise the Linux installer will not show up as a bootable option even with secure boot off.
Create the Linux installer and boot from it
With secure boot handled, download your distro’s ISO and write it to a bootable USB. Rufus is the tool most Windows users reach for.
- Download the ISO from the distro’s official site rather than a mirror or a cached copy
- Check the published SHA-256 checksum against the file you downloaded before writing it, since a damaged ISO produces confusing errors partway through setup rather than a clean failure up front
- Grab the current version of Rufus, since Rufus 4.15, released in mid-2026, improved handling for newer ISO formats
- For Ubuntu specifically, the current release is 26.04 LTS “Resolute Raccoon”
- Plug in the finished USB, reboot and use the boot menu key from the earlier table to pick the drive once, rather than changing the permanent boot order for a single install
Re-enable secure boot after Linux is installed
Flip secure boot back to Enabled the same way you disabled it, if you want the protection back. That is safe for any distro running on a signed shim, such as Ubuntu or Linux Mint.
A few things to expect once you flip it back on:
- A signed shim, the case for most mainstream distros, boots straight through with no prompt
- An unsigned driver or a custom kernel module instead triggers a blue MOK management screen asking you to enroll a new key on the next restart
- Microsoft has been rolling out replacement secure boot certificates through 2026 ahead of the originals expiring, so the trust store behind this feature keeps changing on its own
- A machine that shares the drive with Windows benefits most from re-enabling, since Windows 11 setup checks for an active TPM and secure boot together, so a PC left with the toggle off could show as ineligible for a future feature update even on supported hardware
Fix common secure boot problems
Secure boot violation error when booting the USB
This usually means the setting did not actually save, or the installer expects a boot mode your firmware is not using. Reboot into firmware, confirm Secure Boot still shows Disabled and check that Boot Mode is set to UEFI rather than CSM.
The secure boot option is missing or grayed out
A supervisor or firmware password often locks the option. Boot Mode being stuck on Legacy also hides Secure Boot from the menu entirely. Switch Boot Mode to UEFI first and the option should reappear.
Firmware setup is protected by a password you do not know
Check your manufacturer’s support site rather than guessing. Resetting a forgotten firmware password almost always needs a procedure that varies by model, not a universal shortcut.
GRUB or the Windows boot entry disappears after an update
Windows updates occasionally reset the firmware boot order and can hide a Linux entry. If GRUB throws an error instead of a menu, LinuxForDevices’ fix for a related GRUB error walks through repairing it from a live USB.
Key takeaways
- Secure boot blocks unsigned bootloaders and drivers, not Linux itself
- Ubuntu, Fedora, Mint and openSUSE ship a signed shim already
- Open firmware from Windows search or your manufacturer’s startup key
- Fast Startup can shrink your window for pressing that key
- Secure Boot usually lives under Boot, Security or Authentication
- Older systems may also need Boot Mode switched from CSM
- Re-enabling secure boot later is safe for signed distros
- Unsigned drivers need a MOK enrollment step afterward
- Save your BitLocker recovery key before touching firmware
Frequently asked questions
Do I need to disable secure boot to install Ubuntu?
Usually not. Ubuntu ships a Microsoft-signed shim, so most installers boot and install fine with secure boot left on unless you plan to add unsigned drivers.
Why can’t I find the secure boot option in my BIOS?
Boot Mode is probably still set to Legacy or CSM instead of UEFI. Switch Boot Mode to UEFI first and save, and Secure Boot should reappear in the same menu.
Does disabling secure boot void my warranty?
No. Secure boot is a standard firmware setting that manufacturers expect users to change. Toggling it carries no warranty consequences on its own.
Can I re-enable secure boot after installing Linux?
Yes, the same menu toggle works both ways. Distros with a signed shim boot normally, though unsigned drivers may prompt a MOK enrollment screen first.
Will disabling secure boot affect my Windows installation?
Windows still boots normally with secure boot off. You lose that protection layer, so re-enable it once your Linux install is finished if you want it back.
What if my firmware setup is locked with a password?
Enter the password if you know it. If not, check your manufacturer’s support site, since resetting a forgotten firmware password usually needs a procedure that varies by model.
Which key opens the BIOS if Windows won’t boot at all?
Tap your manufacturer’s key, commonly F2 for Dell and Lenovo or F10 for HP, immediately after power on before any logo finishes loading.
How do I check if secure boot is on without opening firmware?
Open System Information (msinfo32) from Windows and look at the Secure Boot State row on the System Summary page. It reads On or Off without a restart.
Does disabling secure boot stop Windows 11 from being eligible for updates later?
Only if it stays off. Windows 11 checks for an active secure boot state, so re-enable it afterward if Windows shares the machine.
Conclusion
Disabling secure boot for a few minutes to install Linux does not undo that protection for good. Flip it back on once the distro is running. The whole routine gets faster the second time.