You can have more than one user on the same Linux system. The finger command in Linux displays information about the users on the system. It is also referred to as the user information lookup program. It is not present on most distributions by default.
In this tutorial, we will learn how to install and use the finger command.
Let’s get started.
How to install the finger command on your system?
To install the finger command on your system use the apt command as shown below:
apt install finger
Output :

After installing the finger command we can start using it. Let’s see how to use the finger command in the next section.
How to use the finger command?
To start using the finger command, just type finger on your terminal and press enter.
finger
Output :

The output has the following fields :
- Login: User’s account name .
- Name: Full name stored in the system.
- Tty: The type of terminal, account is logged in from.
- Idle: The idle time of the user.
- Login Time: Time of the last login.
- Office: The IP address of the machine from which the account is logged in.
- Office Phone: Shows the phone number if stored while creating the user, otherwise blank.
You can also use the finger command to get information about a particular user. Let’s look at this in the next section.
How to get information about a particular user using the finger command?
To get information about a particular user, use the following syntax.
finger [username]
For example :
finger Adam
Output :

The output has the following fields :
- Login: User’s account name
- Name: Full name stored in the system
- Directory: User’s home directory.
- Shell: The shell user is using.
- Mail: This shows if the user has any mails. This also shows the time user last checked his/her mail.
- Plan: This field shows the contents of any “.plan” and “.project” files present in the user’s home directory.
Let’s try another example.
finger test101
Output :

All of the information in the output for the finger command is entered while creating a user.
When you create a user using the adduser command, you get a prompt to fill the following information.

Display the output column-wise using finger command
You can also get the finger command to display the output column wise. To do that, use the -s flag :
finger -s Adam
Output :

We can see that the fields are now displayed column wise.
How to use the long listing option along with the finger command?
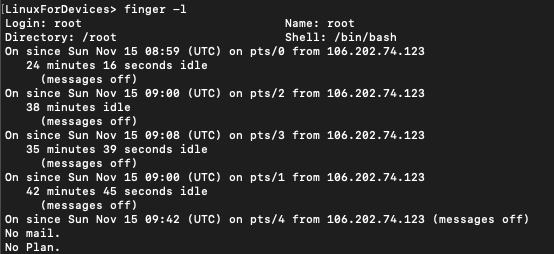
The finger command provides an option to output the list of all the users in a long listing format. To get the list in a long listing format, use -l flag along with the finger command.
finger -l
Output :

You can see that it also produces a log of last logins and time spent idle.
How to output user information in a concise manner using the finger command?
To display the output without the plan field use the -p flag along with the finger command.
finger -p jayant
Output :

You can also use the -p flag along with -l flag to display the long listing format without the plan field.
How to match only the login names using the finger command?
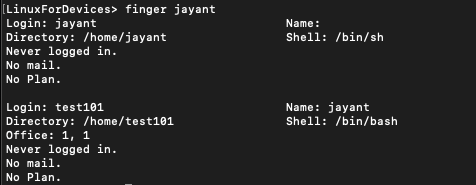
When you use the finger command with an argument, the finger command by default matches the argument with the login name and the name field for a user. Therefore when you run the following command:
finger jayant
You get the following output :

Here we have two users in the output since our argument matches the login name for the first one and the name field for the second one.
To avoid such a case, we can use the -m flag along with the finger command. –m flag makes sure that only the login name is considered for matching.
finger -m jayant
Output :

Now we only get one user entry in the output.
Conclusion
This tutorial was about the finger command in Linux. This command helps you in looking up information about the users on the system. Here’s another article to learn how to list all the users on your Linux system.


