In this article, we’ll see how to install the .so file in Linux. To begin with, installing .so files, it’s important to understand what .so file is and how it works. However, if you already have a good understanding of .so files and want to jump straight into the installation process, you can click here.
What are .so files?
A .so file is a type of file in Linux that contains information and functions that one or more programs can use. It’s like a shared resource that several programs can use to perform certain tasks without having to include the same code in their own programs.
.so files are similar to DLL files in Windows and DYLIB files on macOS, but they are specific to Linux-based systems and the Android operating system.
Usage of .so file in Linux
.so files are used in Linux for resource sharing, modular design, faster loading time, improved security, and easy updates. They contain functions and resources that can be shared by multiple programs, making them more efficient and maintainable.
Examples of .so files in Linux
Libc.so, libpthread.so, libssl.so, libpng.so, and libgtk-x11-2.0.so are a few examples of .so files that are frequently used with Linux. Several Linux programs make use of the memory allocation, thread management, SSL encryption, and GUI development functions found in these shared libraries. Different programs may require different shared libraries, depending on their specific needs.
Steps to Install .so file in Linux
The .so file must be manually placed in the proper location for this method to succeed, and ldconfig must be used to update the library cache.
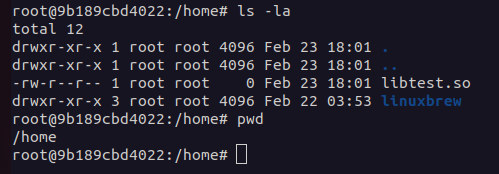
Step 1: Locate The .so File Using pwd Command
The .so file that you want to install must first be located using the pwd command. You may find the file path to the .so file by using this command to print the current working directory. With the cd command, open the terminal and go to the directory containing the .so file. When you are sure you are in the right directory, type pwd to output the directory’s path.
pwd

The pwd the command is the alternative command of cwd in window which is used for printing the working directory in the terminal in Linux. So, we will be using it to get the current working directory path, where the .so file exists in the system.
Step 2: Copy The .so File To /usr/local/lib Directory
The next step is to use the cp command with sudo permission to copy the .so file to the /usr/local/lib directory. It is wise to put your .so file in this directory because that is where many Linux applications look for shared libraries.
sudo cp /x/lib.so /usr/local/lib

The `cp` command is used to copy a file/directory to another path of the system. We are using sudo command to gain access to root privileges to copy the lib.so to the /usr/local/lib directory as this is a protected directory and it can’t be modified by a regular (non-root) user.
Step 3: Update The Shared Library Cache Using ldconfig Command
The final step is to update the shared library cache using the ldconfig command with sudo permission. The system’s shared library cache is updated by this command, enabling any applications that rely on the new library to locate it.
sudo ldconfig

And that’s it! The .so file should now be installed and available for use by any application that depends on it.
Conclusion
In conclusion, installing a .so file in Linux is a straightforward process that only requires copying the file to the proper directory and updating the shared library cache. Any application that relies on the .so file can use it once it has been installed. This procedure enables you to quickly add and manage shared libraries in Linux, regardless of whether you’re adding support for a new piece of software or installing a new library for an already-existing application. You can confidently install any necessary .so files on your Linux system and guarantee that they are accessible for use by any application that needs them by carefully following the step-by-step instructions provided in this article.
References
Also Visit
